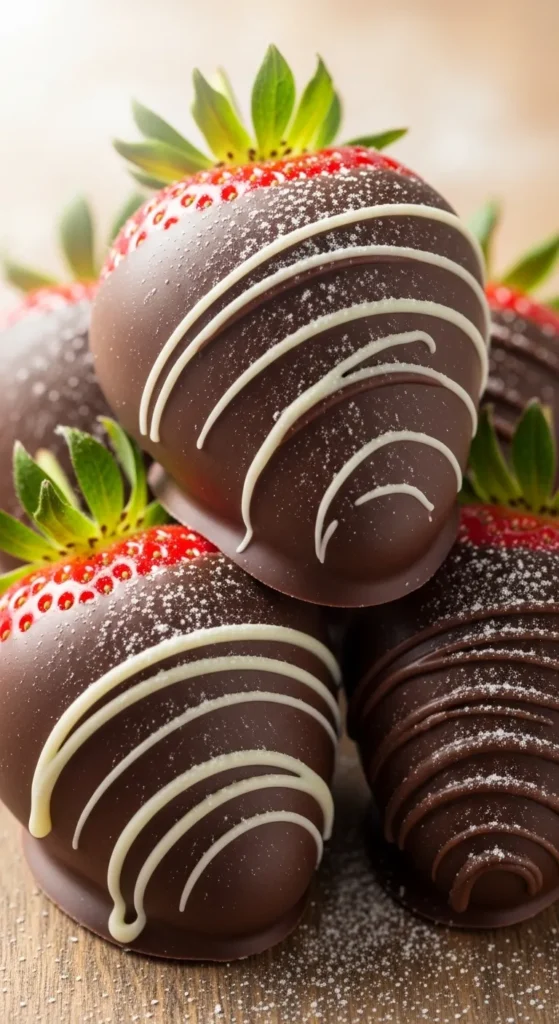
Chocolate Covered Strawberries
If you’re looking for the ultimate culinary “cheat code,” you’ve found it. Chocolate covered strawberries are the only food on the planet that require zero actual cooking but somehow convince people you’re a sophisticated, thoughtful, and high-effort individual. It’s a total lie, of course, you’re basically just dunking fruit in a bowl of melted sugar but we aren’t here to expose your secrets. We’re here to make sure you do it right so you don’t end up with a clump of seized chocolate and a soggy berry that looks like it’s been through a rough breakup.
Why This Recipe is Awesome
The beauty of this “recipe” (if we can even call it that) is the effort-to-reward ratio. You spend about fifteen minutes in the kitchen, and in return, you get the kind of praise usually reserved for people who run marathons or successfully assemble IKEA furniture without crying. It’s also one of the few desserts that feels “light” enough to justify eating ten of them in one sitting. It’s fruit! It has antioxidants! It’s basically a salad if you squint hard enough.
Ingredients You’ll Need
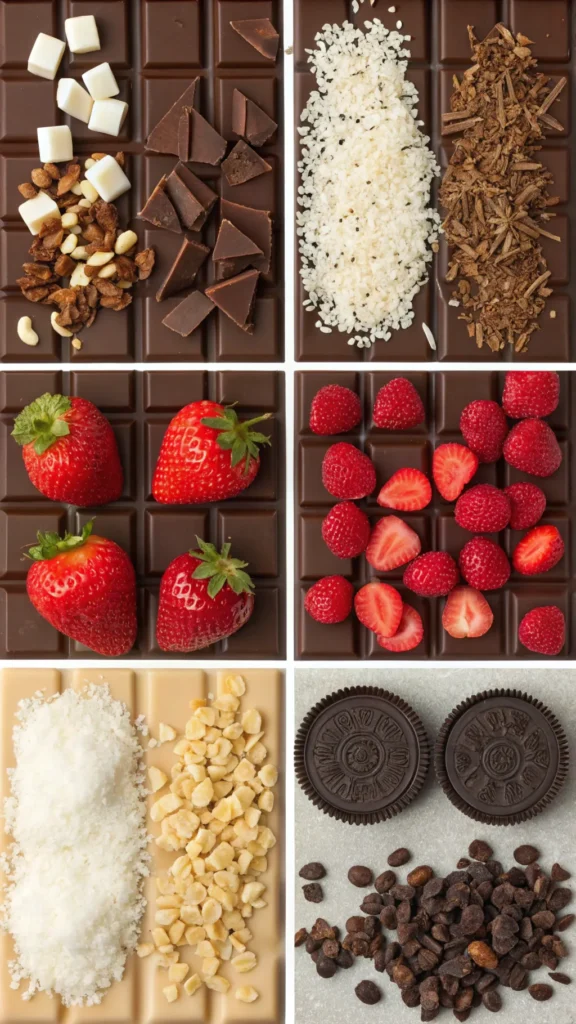
- 1 lb Fresh Strawberries: Look for the ones that still have bright green stems and a deep red color. Size matters here—medium-large is the sweet spot. If they’re too small, you’ll burn your fingers; if they’re too big, they’re awkward to eat.
- 8 oz High-Quality Chocolate: This is not the time for the dusty chocolate chips at the back of the pantry. Grab a couple of bars of high-quality semi-sweet or dark chocolate. The better the chocolate, the better the “snap.”
- 4 oz White Chocolate: For the fancy drizzling.
- 1 tsp Coconut Oil (Optional but Recommended): This is the secret to a glossy finish and a smoother dip. It helps the chocolate flow like a dream.
- Toppings (The Sky’s the Limit): Crushed nuts, sprinkles, shredded coconut, or even crushed Oreos if you want to get wild.
Step-by-Step Instructions
- The Great Drying: This is the most important step. Wash your strawberries, then pat them dry with a paper towel. Now—and I cannot stress this enough—let them air dry for at least 30 minutes. If there is even a single molecule of water on that berry, the chocolate will slide right off like a politician dodging a question.
- The Melt: Chop your chocolate into small, even pieces. You can use a double boiler if you want to feel like a chemist, but the microwave works just fine. Put the chocolate and a tiny bit of coconut oil in a microwave-safe bowl. Heat in 20-second bursts, stirring in between. Stop when there are still a few small lumps left; the residual heat will melt them as you stir.
- The Dip: Line a baking sheet with parchment paper. Grab a strawberry by the green leaves (the “handle”) and dunk it into the chocolate. Give it a little swirl to get an even coat, then lift it out.
- The Drain: Hold the berry over the bowl for a second to let the excess chocolate drip off. Gently scrape the bottom of the berry against the edge of the bowl so you don’t end up with a giant “foot” of chocolate on your parchment paper.
- The Landing: Place the berry on the parchment paper. If you’re adding dry toppings like nuts or sprinkles, do it immediately before the chocolate sets.
- The Drizzle: Once the dark chocolate has hardened (about 10–15 minutes in the fridge), melt your white chocolate. Dip a fork or a small spoon into the white chocolate and move it back and forth rapidly over the berries to create those professional-looking stripes.
- The Set: Pop the tray in the fridge for about 30 minutes. You want that chocolate firm and chilled, but don’t leave them in there for five hours, or the berries might start to “sweat.”
Common Mistakes to Avoid
- Water in the Chocolate: If a drop of water gets into your melting chocolate, it will “seize.” This means it turns into a gritty, clumpy paste that looks like wet sand. There is no saving it. Keep your workspace bone-dry!
- Using Cold Berries: If your strawberries are freezing cold when you dip them, the chocolate will set too fast, making it hard to get a smooth finish. Let the fruit come to room temperature before you start your dip-a-thon.
- Overheating the Chocolate: If you microwave the chocolate for too long, it will burn and smell like despair. Slow and steady wins the race. If the bowl feels hot to the touch, stop heating and just stir.
- Storing them too long: Chocolate covered strawberries are best eaten the day they are made. After 24 hours, the strawberry starts to release its juices, and the chocolate might start to pull away. FYI, they are a “live in the moment” kind of dessert.
Alternatives & Substitutions

- The “Tuxedo” Look: Dip the berry in white chocolate first, let it set, then dip the sides in dark chocolate at an angle to create a little “jacket” look. It’s adorable and highly impressive to people who don’t know it only took an extra two minutes.
- Boozy Berries: You can soak the strawberries in vodka or champagne for an hour before drying them. Just make sure you dry them extremely well after their bath, or the chocolate won’t stick.
- Nut-Free/Dairy-Free: Use high-quality vegan chocolate and omit the nuts for a delicious allergen-friendly version. IMO, dark chocolate is usually the safest bet for dairy-free diets anyway.
- The “Lazy” Version: If you can’t be bothered with dipping, just arrange the berries on a plate and drizzle the melted chocolate over the top in a messy, “abstract art” style. Call it deconstructed. It’s trendy.
Final Thoughts
There you have it. You are now officially equipped to create the world’s most romantic (and easiest) dessert. It’s elegant, it’s delicious, and it makes you look like a total pro. The most important thing to remember is to have fun with it and maybe eat a few of the “mistakes” along the way. After all, the chef deserves a reward for all that “hard work” of standing in the kitchen for fifteen minutes. Now go grab some berries, melt some chocolate, and prepare for the standing ovation you’re about to receive. You’ve got this!