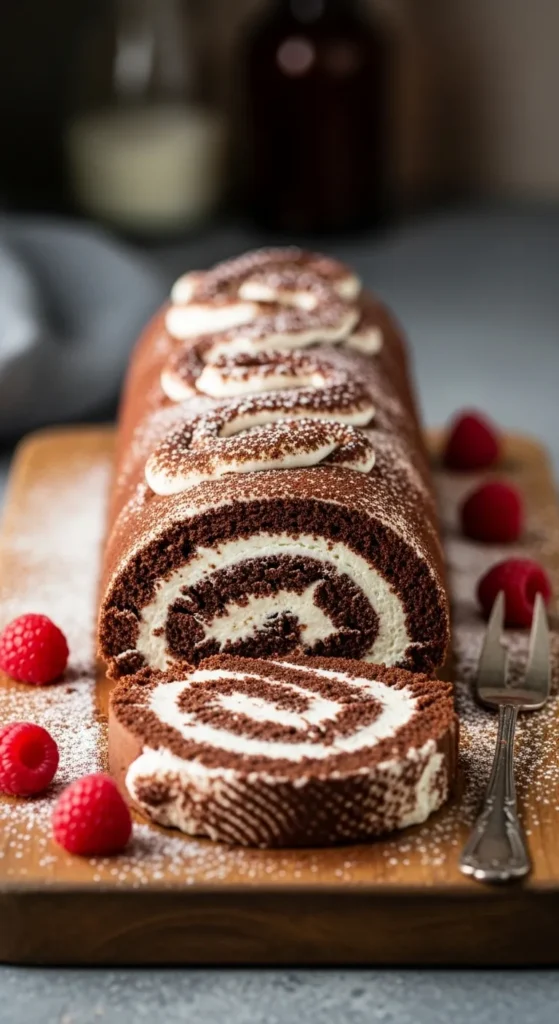
Chocolate Swiss Roll Cake Recipe
So you want cake, but like, rolled?
You know that moment when you want something chocolatey, impressive, and comforting but you also don’t want to wrestle with ten layers, fancy piping tips, or your own sanity? Yeah. Enter the chocolate Swiss roll cake. It looks like it came from a fancy bakery window, but plot twist: it’s basically a sponge cake that decided to do yoga and roll itself up. And honestly? We love that for it.
This is the kind of dessert that makes people say, “Wait, you made this?” And you get to casually shrug like, “Oh, this old thing?” (Even if you were panicking about cracks five minutes ago. No judgment.)
Why This Recipe Is Awesome
First of all, it’s chocolate. That alone should end the discussion.
But also:
- It looks fancy without requiring fancy skills. Huge win.
- The sponge is light and fluffy, not dense and sad.
- You can fill it with whatever your heart desires (cream, ganache, jam live your truth).
- It’s way easier than it looks. Seriously, Swiss rolls have a scary reputation, but this one is shockingly forgiving.
IMO, this is one of those recipes that makes you feel like a baking genius even if you’re just following instructions and hoping for the best. Plus, rolling cake feels weirdly therapeutic. Or mildly stressful. Depends on the day.
Ingredients You’ll Need
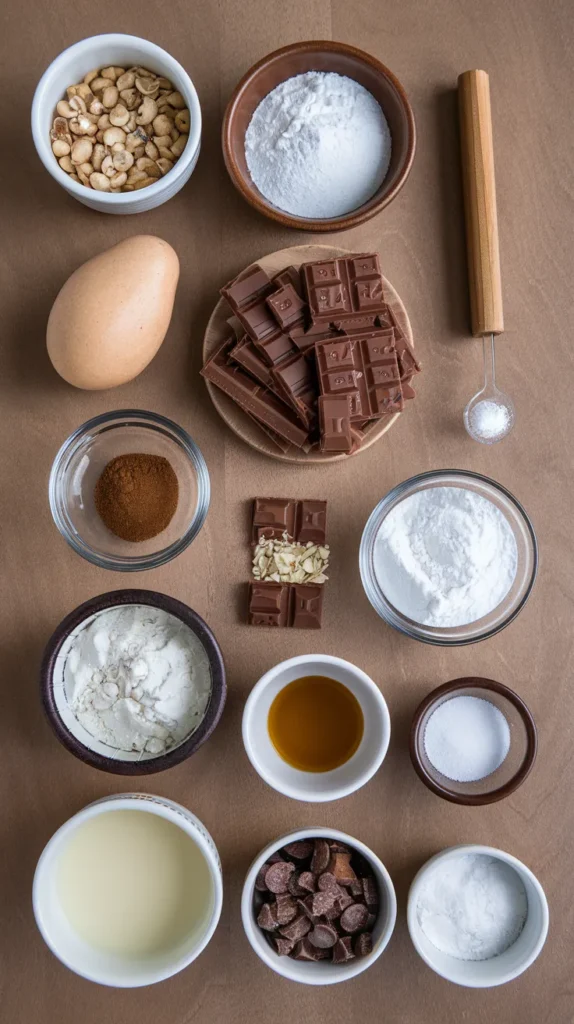
Nothing wild here. No unicorn tears. Just regular grocery-store stuff.
For the chocolate sponge cake:
- 4 large eggs – Room temp, please. Cold eggs are grumpy eggs.
- ¾ cup granulated sugar – Sweet, but not “toothache” sweet.
- ½ cup all-purpose flour – The backbone of the operation.
- ¼ cup cocoa powder – Use unsweetened unless you enjoy chaos.
- 1 tsp baking powder – For that light, airy vibe.
- ¼ tsp salt – Because balance is a thing.
- 1 tsp vanilla extract – Chocolate’s best friend.
- 2 tbsp oil or melted butter – Moisture = happiness.
For the filling (classic option):
- 1 cup heavy whipping cream
- 2 tbsp powdered sugar – Adjust to taste.
- ½ tsp vanilla extract
Optional but encouraged:
- Powdered sugar for dusting – For aesthetic purposes.
Step-by-Step Instructions

Don’t overthink this. You’ve got this.
- Preheat your oven to 180°C (350°F).
Line a rectangular baking tray with parchment paper. Don’t skip this unless you enjoy peeling cake off metal like a raccoon. - Whip the eggs and sugar.
Beat them together until pale, thick, and fluffy. You’re aiming for “tripled in volume” energy. This step is crucial don’t rush it. - Add vanilla and oil (or butter).
Gently mix them in. Keep things light and airy. Aggressive mixing is not the vibe here. - Sift the dry ingredients together.
Flour, cocoa powder, baking powder, salt. Yes, sifting matters. No, I don’t make the rules. - Fold dry ingredients into the egg mixture.
Use a spatula and a gentle hand. Do not stir like you’re mad at it. Folding keeps the batter fluffy. - Pour into the prepared tray and smooth it out.
Spread evenly. Give the tray a gentle tap to release air bubbles. - Bake for 10–12 minutes.
The cake should spring back lightly when touched. Overbaking is the enemy remember that. - Roll it while it’s warm.
Dust a clean kitchen towel with powdered sugar, flip the cake onto it, peel off the parchment, and gently roll it up with the towel. Let it cool rolled. This trains the cake not to crack later. Yes, cake training is a thing. - Whip the cream.
Beat cream, powdered sugar, and vanilla until soft peaks form. Stop before it turns into butter. Please. - Unroll, fill, and re-roll.
Spread the cream evenly, leaving a small border. Roll it back up (without the towel this time). Seam side down. Boom.
Common Mistakes to Avoid
Let’s save you from heartbreak.
- Skipping the towel roll step.
This is how cracks happen. And while cracks are delicious, they’re also annoying. - Overbaking the sponge.
Dry cake doesn’t like to roll. It likes to break and embarrass you. - Under-whipping or over-whipping the eggs.
One gives you a flat cake. The other… well, scrambled vibes. Aim for fluffy and glossy. - Overfilling the roll.
I know it’s tempting. But too much filling = cream explosion. Learn from others’ mistakes.
Alternatives & Substitutions
Feeling experimental? Or just missing ingredients? Same.
- No heavy cream?
Use mascarpone mixed with a little milk. Rich, creamy, and slightly indulgent (in a good way). - Dairy-free?
Coconut cream works great. Bonus: subtle coconut-chocolate combo. - Want it extra chocolatey?
Swap the cream filling for chocolate ganache. Is it intense? Yes. Is it worth it? Also yes. - Gluten-free?
A good 1:1 gluten-free flour blend usually works. Just be extra gentle when rolling. - Flavor twist?
Add espresso powder to the batter or orange zest to the cream. Fancy without trying too hard.
Final Thoughts
Look at you. You just made a chocolate Swiss roll cake. That’s not “basic baking”that’s impressive. Whether it’s a little wonky or bakery-perfect, it’s homemade, chocolatey, and rolled with love (and maybe a bit of panic).
Slice it up, dust it with powdered sugar, and enjoy the moment. Share it with friends, family, or keep it all to yourself no one’s judging. Now go flex those baking skills. You’ve earned every bite.